The goal of this lesson is help you to become familiar with the Borland JBuilder tool, and for you to write, compile, and execute a simple Java application that displays the message "Hello world!".
Start by loading the Borland JBuilder tool. JBuilder remembers the most recent project you've worked on, and automatically opens it for you. Since we're creating a new project, however, we need to close it and create a new project.
JBuilder will now display a Project Wizard. This wizard will ask you for information about your project, and then generate a project file for you.
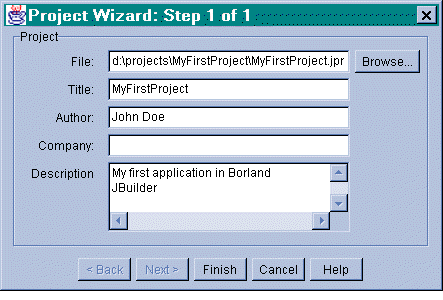
Figure 1.0 - Project Wizard prompts you for details about your project
Once you've created a project, you can begin to write your first Java application. The project view allows you to manage your project's files. You can select a file, and edit it, or you can add/remove files using the 'Add to project' and 'Remove from project' buttons. These can be easily recognised by the plus and minus signs on these buttons.
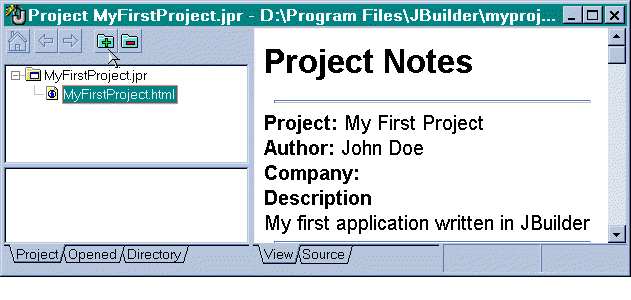
Figure 2.0 - Project view allows you to select, add and remove files
To write an application, we'll need to create a new source file, which we'll call "HelloWorld.java".
Up until now, we haven't had to write any code. Now its time to get your hands dirty. Start by typing the following code into the "HelloWorld.java" file from Step Two.
package MyFirstProject;

public class HelloWorld
{
       public static void main(String args[]) throws Exception
       {
              System.out.println ("Hello world!");
              System.in.read();
       }
}
Don't worry if you're a little unsure about what the code does. We'll examine the code line by line.
1: package MyFirstProject;
This line states that the class belongs to the package MyFirstProject. A package is a collection of Java classes and interfaces. We group logically related code together in a package. As a general rule, each application should have its own unique package. Use the same name for your package as you do for your project.
2: public class HelloWorld
This line declares a new class, called "HelloWorld", and that it is publicly accessible. A class is composed of data variables (members), and functions (methods).
3: public static void main(String args[]) throws IOException
All applications written in Java share at least one thing in common - they all have a main method. You must declare a public static main method that accepts command line parameters (args), for your application to run. Our main method also declares that it could generate an I/O error when reading input from the user.
4: System.out.println ("Hello world!");
This is where our application writes a message to the user. System.out is an object that allows us to write to "standard output", which is the user's console.
5: System.in.read();
So that you can read the message before the application terminates, we need to wait for keyboard input. System.in is an object that allows us to read from "standard input", which is the sequence of characters entered by the user.
Before you can run an application, you must first compile it. A compiler takes source code (the instructions for a program), and converts it into executable instructions (a program that can be run). We'll compile the HelloWorld application now.
If you've typed in the code correctly, your application will now be ready to run. If not, carefully check your code again, and repeat.
Once the application is compiled, its ready to run. JBuilder runs applications in their own window, which you'll see in a moment.
The HelloWorld application will then appear in a new window. You'll see the message "Hello World!", and the program will wait patiently until you press the <ENTER> key.
At the conclusion of this lesson, you should be able to do the following :-
- Create a new project
- Add files to your project
- Write code to send messages to standard output
- Compile code
- Execute compiled code
|
Copyright 1998, 1999, 2000 David Reilly
|
Privacy | Legal | Linking | Advertise! |
|
Last updated:
Monday, June 05, 2006
|